How to make Debit Card Validator using HTML, CSS & JS
In this quick tutorial we will show you how to create a simple credit card form. We'll build the whole thing from scratch, with a little help from Bootstrap 3 for the interface, and Payform.js for client-side form validation you can use Debit Card Generator for testing and also to validate your Debit Card.
Keep in mind that storing credit card data on your servers is serious business. You need to be PCI compliant and fulfill a vast number of requirements. Unless you know what you're doing, it is best to use the services of a third party payment processor like Stripe or PayPal that stores all payment information for you.
Project Overview
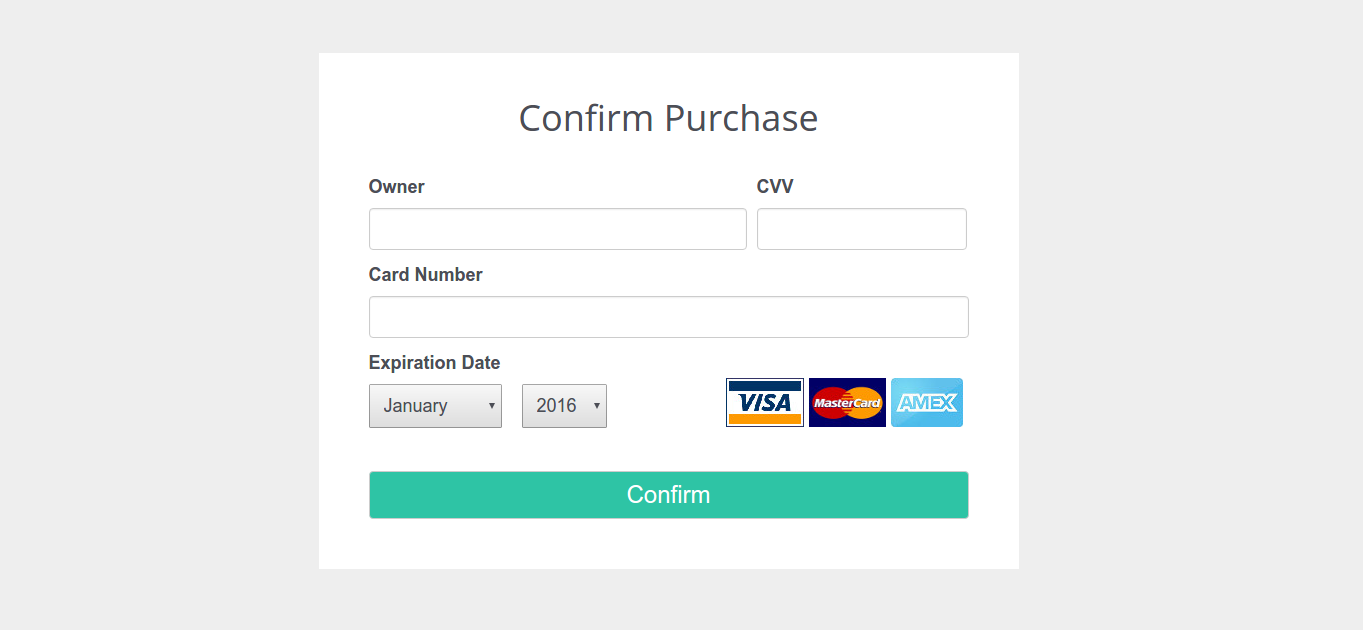
Here is a sneak-peak of what we will be building in this tutorial:

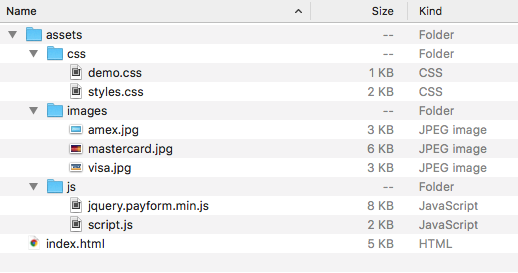
You can get the full code for this project from the Download button near the top of the article. An overview of the files can be seen below:

There are two .css files and two .js files which we will need to include in our HTML. All other resources such as the Bootstrap framework, jQuery, and web fonts will be included externally via CDN.
index.html
<!DOCTYPE html>
<html>
<head>
    <meta charset="utf-8">
    <meta name="viewport" content="width=device-width, initial-scale=1">
    <title>Credit Card Validation Demo</title>

    <link href="https://fonts.googleapis.com/css?family=Open+Sans" rel="stylesheet">
    <link rel="stylesheet" href="http://maxcdn.bootstrapcdn.com/bootstrap/3.3.7/css/bootstrap.min.css">
    <link rel="stylesheet" type="text/css" href="assets/css/styles.css">
    <link rel="stylesheet" type="text/css" href="assets/css/demo.css">
</head>

<body>

    <!-- The HTML for our form will go here -->

    <script src="https://ajax.googleapis.com/ajax/libs/jquery/1.12.4/jquery.min.js"></script>
    <script src="assets/js/jquery.payform.min.js" charset="utf-8"></script>
    <script src="assets/js/script.js"></script>
</body>
</html>
Now that everything is set up, we can start building our credit card form. Let's start with the HTML layout!
Layout
A credit card dialog needs to be simple, short, and straightforward. Here are the four input fields that every credit card form needs to have:
- Credit card owner name
- Card number
- Secret code (also known as CVV/CVC/CID)
- Expiration Date
All we need to do is create a <form> and add all the required input fields. For the owner, card number, and CVV we will use simple text fields. For the expiration date we'll put a combination of two selects with predefined options.
Besides that our form will have a heading, a submit button, and images for popular credit card vendors. Since we are working with Bootstrap there is a little extra markup, but it helps keep the code organized and the layout responsive.
<div class="creditCardForm">
    <div class="heading">
        <h1>Confirm Purchase</h1>
    </div>
    <div class="payment">
        <form>
            <div class="form-group owner">
                <label for="owner">Owner</label>
                <input type="text" class="form-control" id="owner">
            </div>
            <div class="form-group CVV">
                <label for="cvv">CVV</label>
                <input type="text" class="form-control" id="cvv">
            </div>
            <div class="form-group" id="card-number-field">
                <label for="cardNumber">Card Number</label>
                <input type="text" class="form-control" id="cardNumber">
            </div>
            <div class="form-group" id="expiration-date">
                <label>Expiration Date</label>
                <select>
                    <option value="01">January</option>
                    <option value="02">February </option>
                    <option value="03">March</option>
                    <option value="04">April</option>
                    <option value="05">May</option>
                    <option value="06">June</option>
                    <option value="07">July</option>
                    <option value="08">August</option>
                    <option value="09">September</option>
                    <option value="10">October</option>
                    <option value="11">November</option>
                    <option value="12">December</option>
                </select>
                <select>
                    <option value="16"> 2016</option>
                    <option value="17"> 2017</option>
                    <option value="18"> 2018</option>
                    <option value="19"> 2019</option>
                    <option value="20"> 2020</option>
                    <option value="21"> 2021</option>
                </select>
            </div>
            <div class="form-group" id="credit_cards">
                <img src="assets/images/visa.jpg" id="visa">
                <img src="assets/images/mastercard.jpg" id="mastercard">
                <img src="assets/images/amex.jpg" id="amex">
            </div>
            <div class="form-group" id="pay-now">
                <button type="submit" class="btn btn-default" id="confirm-purchase">Confirm</button>
            </div>
        </form>
    </div>
</div>
Now that we have the needed input fields, we can setup the validation rules.
Validation
All of the validation we will show here is client side and done exclusively in the JavaScript. If it is HTML validation that you are interested in, check out this article.
To kick things off we will define all the jQuery selectors we will need:
var owner = $('#owner'),
    cardNumber = $('#cardNumber'),
    cardNumberField = $('#card-number-field'),
    CVV = $("#cvv"),
    mastercard = $("#mastercard"),
    confirmButton = $('#confirm-purchase'),
    visa = $("#visa"),
    amex = $("#amex");
Then, using Payform.js, we will turn our basic input fields into specialized input for credit card data. We simply need to call the right function and the library will automatically handle text formatting and maximum string length for us:
cardNumber.payform('formatCardNumber');
CVV.payform('formatCardCVC');
Next, we want to be able to give real-time feedback to users while they are typing in their card number. To do so we will write a simple function that does two things:
- Check if the current text in the field is а valid card number or not. Add appropriate coloring to the text field.
- Depending on the present input characters, see if the card is either Visa, MasterCard, or American Express. This is done using the
payform.parseCardType()method.
Since we want to execute the above actions every time a new character is typed in, we will use the jQuery keyup() event listener.
cardNumber.keyup(function() {
    amex.removeClass('transparent');
    visa.removeClass('transparent');
    mastercard.removeClass('transparent');

    if ($.payform.validateCardNumber(cardNumber.val()) == false) {
        cardNumberField.removeClass('has-success');
        cardNumberField.addClass('has-error');
    } else {
        cardNumberField.removeClass('has-error');
        cardNumberField.addClass('has-success');
    }

    if ($.payform.parseCardType(cardNumber.val()) == 'visa') {
        mastercard.addClass('transparent');
        amex.addClass('transparent');
    } else if ($.payform.parseCardType(cardNumber.val()) == 'amex') {
        mastercard.addClass('transparent');
        visa.addClass('transparent');
    } else if ($.payform.parseCardType(cardNumber.val()) == 'mastercard') {
        amex.addClass('transparent');
        visa.addClass('transparent');
    }
});
There is one more thing we have to do and that is is check if all the field are holding valid data when the user tries to submit the form.
Name validation can be quite tricky. To keep this tutorial light, we won't be going into that subject, and we will only check if the input name is at least 5 characters long. Payform provides us with the needed methods for validating the rest of the form.
confirmButton.click(function(e) {
    e.preventDefault();

    var isCardValid = $.payform.validateCardNumber(cardNumber.val());
    var isCvvValid = $.payform.validateCardCVC(CVV.val());

    if(owner.val().length < 5){
        alert("Wrong owner name");
    } else if (!isCardValid) {
        alert("Wrong card number");
    } else if (!isCvvValid) {
        alert("Wrong CVV");
    } else {
        // Everything is correct. Add your form submission code here.
        alert("Everything is correct");
    }
});
The above validation is for educational purposes only and shouldn't be used on commercial projects. Always include both client-side and server-side validation to your forms, especially when working with credit card data.
Styles
We are using Bootstrap, so most of the styling is done by the framework. Our CSS mostly covers the size of the input fields and various padding, margin and font tweaks.
styles.css
.creditCardForm {
    max-width: 700px;
    background-color: #fff;
    margin: 100px auto;
    overflow: hidden;
    padding: 25px;
    color: #4c4e56;
}
.creditCardForm label {
    width: 100%;
    margin-bottom: 10px;
}
.creditCardForm .heading h1 {
    text-align: center;
    font-family: 'Open Sans', sans-serif;
    color: #4c4e56;
}
.creditCardForm .payment {
    float: left;
    font-size: 18px;
    padding: 10px 25px;
    margin-top: 20px;
    position: relative;
}
.creditCardForm .payment .form-group {
    float: left;
    margin-bottom: 15px;
}
.creditCardForm .payment .form-control {
    line-height: 40px;
    height: auto;
    padding: 0 16px;
}
.creditCardForm .owner {
    width: 63%;
    margin-right: 10px;
}
.creditCardForm .CVV {
    width: 35%;
}
.creditCardForm #card-number-field {
    width: 100%;
}
.creditCardForm #expiration-date {
    width: 49%;
}
.creditCardForm #credit_cards {
    width: 50%;
    margin-top: 25px;
    text-align: right;
}
.creditCardForm #pay-now {
    width: 100%;
    margin-top: 25px;
}
.creditCardForm .payment .btn {
    width: 100%;
    margin-top: 3px;
    font-size: 24px;
    background-color: #2ec4a5;
    color: white;
}
.creditCardForm .payment select {
    padding: 10px;
    margin-right: 15px;
}
.transparent {
    opacity: 0.2;
}
@media(max-width: 650px) {
    .creditCardForm .owner,
    .creditCardForm .CVV,
    .creditCardForm #expiration-date,
    .creditCardForm #credit_cards {
        width: 100%;
    }
    .creditCardForm #credit_cards {
        text-align: left;
    }
}
With this our Credit Card Validation Form is complete!